
Baked zucchini chips might just be the sneakiest way I’ve found to get more veg into snack time without the guilt. There’s something about that crispy, golden edge that makes the whole kitchen smell like a fry shop—minus the oil splatters and greasy aftertaste. It’s a simple trick: thin slices of zucchini, a quick toss in seasoning, baked until they’re crackly and almost chip-like.
What keeps me coming back to this recipe is how customizable it is—add a pinch of smoked paprika, a dash of garlic powder, or even a sprinkle of Parmesan. It’s a snack that feels indulgent but is actually pretty good for you. Plus, once you get the hang of slicing those zucchinis evenly, it’s almost meditative—like a little kitchen ritual that’s surprisingly satisfying.
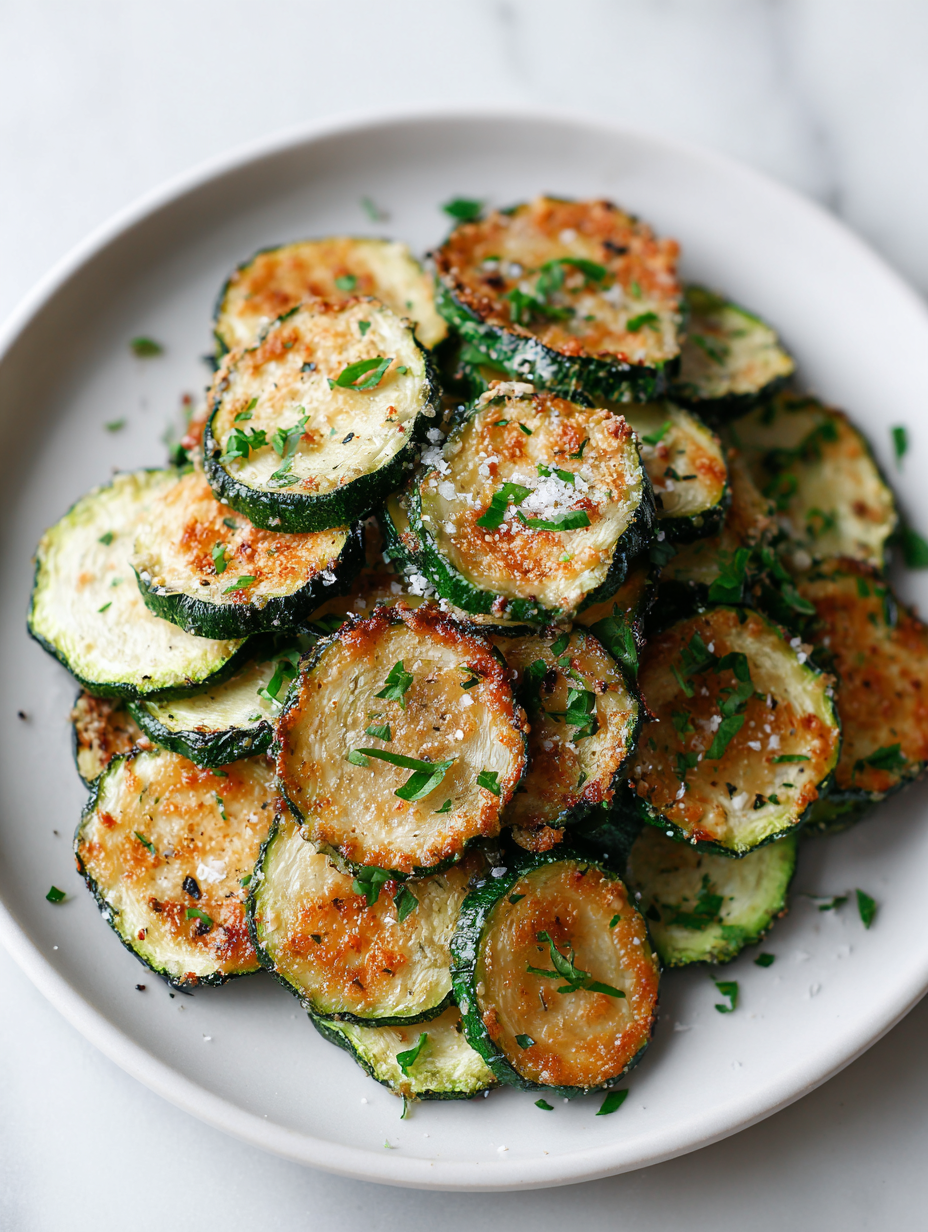
Focusing on the surprisingly crunchy texture that baked zucchini chips can achieve without deep frying, turning a humble vegetable into a satisfying snack.
The story behind this recipe
- I first stumbled upon the idea of zucchini chips during a summer visit to a friend’s house. She had a bunch of zucchinis from her garden, and we were looking for a way to make a snack that didn’t involve deep frying. The smell of baked, crispy zucchini filled the kitchen and made everyone stop and snack. That moment made me realize how simple ingredients, when treated right, can turn into something unexpectedly satisfying.
- Ever since, I’ve kept tweaking the seasoning and baking times, chasing that perfect crunch. It’s become a go-to for those times I want a guilt-free treat that still feels a little indulgent. Plus, it’s one of those recipes that’s easy to toss together with whatever you have on hand, which makes it even better for lazy weekends or last-minute cravings.
- heading: The story behind this recipe
Ingredient breakdown: key components
- Zucchini: I prefer young, firm zucchinis with a deep green color—the fresher, the crunchier. Slice thinly and evenly, about 2 mm, so they bake uniformly.
- Olive oil: Just a light spray or brush adds enough crispness without greasiness. Skip heavy oils; the flavor gets muddled. A smoky extra virgin gives a richer note.
- Salt: I use sea salt, but kosher salt works well too. Sprinkle generously for that savory punch—think of it as the seasoning that makes or breaks the crunch.
- Seasonings: Garlic powder, smoked paprika, or a pinch of cayenne elevate the flavor. Use sparingly; too much can overpower the delicate zucchini taste.
- Breadcrumbs (optional): I sometimes toss in a few crushed panko for extra crunch. Not necessary, but it adds a satisfying texture contrast.
- Parmesan (optional): A sprinkle before baking gives a salty, cheesy crust. If avoiding dairy, nutritional yeast works great for that umami kick.
- Baking sheet: Use a rimmed one lined with parchment paper. It prevents sticking and helps distribute heat evenly for a crisp finish.
Spotlight on key ingredients
Zucchini:
- I look for young, firm zucchinis with a deep green hue—the fresher, the crunchier. Slice them as thin as possible, about 2 mm, for even crisping.
- Olive oil: Just a light spray or brushing adds crispness without greasiness. The rich, smoky aroma of good extra virgin olive oil really makes a difference in flavor and texture.
Seasonings:
- Salt: I prefer flaky sea salt for its clean, mineral punch. Sprinkle generously—it’s the secret to that addictive savory crunch.
- Garlic powder, smoked paprika, or cayenne elevate the flavor. Use sparingly; too much can mask the delicate zucchini taste.
Notes for ingredient swaps
- Olive Oil: I prefer extra virgin for its smoky, fruity aroma—use a neutral oil like vegetable if you want milder flavor.
- Salt: Kosher salt gives a cleaner taste, but sea salt’s mineral notes add a subtle complexity. Adjust quantity accordingly.
- Seasonings: Instead of smoked paprika, try cumin or chili powder for different smoky or spicy layers—less intense, but just as satisfying.
- Breadcrumbs: Gluten-free panko or crushed almonds can replace regular breadcrumbs. Expect a slightly different crunch and nuttiness.
- Parmesan: Nutritional yeast adds cheesy umami if dairy isn’t an option—less salty but still flavorful and flaky.
- Vinegar: A splash of apple cider vinegar in the seasoning mix brightens the overall flavor—skip if you prefer a milder profile.
- Parchment Paper: Silicone baking mats can be a reusable alternative, offering even heat distribution and easy cleanup.
Equipment & Tools
- Mandoline or sharp knife: To slice zucchinis uniformly thin for even baking.
- Baking sheet: To hold the slices during baking, ensuring air circulation.
- Parchment paper: To prevent sticking and promote crispness.
- Spray bottle or brush: To lightly coat slices with oil without excess.
- Cooling rack: To cool and crisp the chips after baking.
Step-by-step guide to baked zucchini chips
- Gather all equipment: a sharp mandoline or knife, baking sheet, parchment paper, a small bowl, and a spray bottle or brush. Preheat your oven to 200°C (390°F).
- Wash zucchinis thoroughly. Slice them very thin, about 2 mm, using the mandoline or a sharp knife. Aim for even slices for uniform baking.
- Place sliced zucchini in a bowl. Lightly spray with olive oil or brush gently, just enough to coat. Toss with a pinch of salt and optional seasonings like garlic powder or smoked paprika.
- Line your baking sheet with parchment paper. Spread zucchini slices in a single layer, not overlapping. Use a rack if you want extra crispness.
- Bake in the preheated oven for 20-25 minutes. Check at 15 minutes: they should begin to turn golden at the edges and smell toasted.
- a. If they start to brown too quickly, lower the oven temperature slightly. b. If they’re not crisp after 25 minutes, give them a few more minutes, watching closely. c. If they stick, gently slide a spatula underneath to lift them.
- Once golden and crispy, remove from oven. Let them rest on the baking sheet for 5 minutes to firm up. They will crisp further as they cool.
- Transfer to a cooling rack or plate. Serve immediately for maximum crunch, or store for later.
Let the chips rest on a rack for 5 minutes. Serve warm or cooled. For storage, keep in an airtight container at room temperature for up to 2 days. Reheat in a 180°C (355°F) oven for 5-7 minutes until crispy again.
How to Know It’s Done
- Edges are deeply golden and slightly curled, indicating crispness.
- Zucchini slices are firm and crackle when broken, not soggy or limp.
- Color is uniform with no burnt patches, and smell is toasted and fragrant.
Baked Zucchini Chips
Ingredients
Equipment
Method
- Begin by preheating your oven to 200°C (390°F) and lining a baking sheet with parchment paper.
- Wash the zucchinis thoroughly and pat them dry with a towel.
- Using a mandoline or a sharp knife, slice the zucchinis very thinly, about 2 mm thick, aiming for even slices for uniform baking.
- Place the zucchini slices in a large bowl. Lightly spray or brush them with olive oil, just enough to coat each slice lightly, then sprinkle with sea salt, garlic powder, and smoked paprika if using. Toss gently to distribute the seasonings evenly.
- Arrange the seasoned zucchini slices in a single layer on the prepared baking sheet, making sure they do not overlap to ensure crispiness.
- Bake in the preheated oven for 20-25 minutes, checking around the 15-minute mark. The slices should turn golden at the edges and smell toasted when ready.
- Once crispy and golden, remove the baking sheet from the oven and let the chips rest for about 5 minutes on a cooling rack to firm up further.
- Transfer the chips to a plate or serve directly from the rack. Enjoy immediately while crispy, or store in an airtight container for up to 2 days for a satisfying snack.
Notes
Pro tips for perfect zucchini chips
- Thinness: Use a mandoline for slices around 2 mm—uniform slices make for even crisping.
- Oil Application: Lightly spray or brush zucchini to avoid soggy chips; too much oil weighs them down.
- Oven Check: Keep an eye at 15 minutes—edges should be golden and fragrant, not burnt or pale.
- Spacing: Arrange slices in a single layer on the baking sheet—overlapping prevents crispness.
- Rest Time: Let baked chips rest for 5 minutes to firm up; they’ll crisp further as they cool.
- Flavor Boost: Add a pinch of smoked paprika or garlic powder before baking for extra depth.
- Storage: Keep in an airtight container at room temp for up to 2 days; reheat at 180°C (355°F) for crispness.
Common mistakes and how to fix them
- FORGOT to pat zucchinis dry → Soggy chips; pat slices dry before baking.
- DUMPED oil on slices → Excess oil; use a light spray or brush for crispness.
- OVER-TORCHED at edges → Burnt; lower oven or check early.
- MISSED even slices → Uneven baking; slice uniformly for consistent crunch.
Quick fixes and pantry swaps
- When slices stick, splash a little more oil and gently loosen with a spatula.
- If chips are soggy, increase oven temp slightly and bake 2-3 minutes longer.
- Damp zucchini? Pat slices dry thoroughly before seasoning and baking.
- Over-baked? Reduce heat to prevent burnt edges and check early next time.
- When in doubt, swap bread crumbs with crushed nuts for extra crunch and flavor.
Prep, store, and reheat tips
- Prep the zucchini slices ahead by slicing thinly and arranging on a parchment-lined tray—keeps them from sticking and saves time later.
- Store baked chips in an airtight container at room temperature for up to 2 days; crispness diminishes after that, so best enjoyed fresh.
- Reheat in a 180°C (355°F) oven for 5-7 minutes, watching for that initial crackle and shimmering golden edges to return.
- For longer storage, freeze baked chips in a single layer in a sealed bag for up to 1 month; reheat directly from frozen for best crunch.
- Avoid refrigerating, as moisture will make them soggy; keep in a dry, cool place for optimal crispness and sensory satisfaction.
Top questions about baked zucchini chips
1. How thin should the zucchini slices be?
Thin, even slices are key. Use a mandoline or a sharp knife for best results.
2. Can I make these oil-free?
Yes, you can skip the oil, but expect a less crispy chip. A light spray helps achieve crunch.
3. How long do I bake zucchini chips?
Bake at 200°C (390°F) for 20-25 minutes. Keep an eye towards the end to prevent burning.
4. What equipment do I need?
Use a rimmed baking sheet lined with parchment paper. This prevents sticking and promotes even crisping.
5. How do I store leftovers?
Store in an airtight container at room temperature for up to 2 days. Reheat at 180°C (355°F) for 5-7 minutes.
6. Can I customize the seasonings?
Adjust seasonings to your taste—try smoked paprika, garlic powder, or cayenne for different flavors.
7. What type of zucchini is best?
Use young, firm zucchinis with a deep green color. Slicing uniformly ensures even baking.
8. How do I prevent soggy chips?
Make sure slices are dry before baking to prevent sogginess. Pat them with a paper towel if needed.
9. When should I add salt?
Add a pinch of salt after baking if you want more flavor, but avoid over-salting the slices before baking.
10. Can I add other toppings or ingredients?
Yes, adding crushed almonds or panko can give extra texture, but watch for longer baking times.
These baked zucchini chips are a reminder that the simplest ingredients can surprise you with a satisfying crunch. They’re perfect for when you want a snack that feels a little indulgent but isn’t loaded with guilt. Plus, they’re a great way to make use of those zucchinis lurking in your fridge.
Whenever I make these, I’m struck by how something so humble can bring a bit of joy—crisp, flavorful, and just a little bit addictive. They’re not just a snack; they’re a little kitchen victory, especially when served warm and fragrant straight from the oven.