
Making baked corn chips at home is like reclaiming a small piece of snack-time joy. There’s something satisfying about taking simple ingredients—corn, oil, salt—and transforming them into crispy, golden chips that you can customize with your favorite spices or flavors. It turns an ordinary snack into a mindful little ritual, a chance to slow down and enjoy the process.
This recipe is also about control—knowing exactly what’s in your chips, avoiding the excess oils and preservatives from store-bought versions. Plus, it’s a playful way to experiment with different seasonings or even add a touch of heat or smokiness. It’s a snack that feels personal, fresh, and a little bit creative, right from your own oven.
Focusing on how making baked corn chips at home can be a playful, customizable process that reconnects you with simple ingredients, turning snack time into a mindful, sensory experience rather than just a quick crunch.
The story behind this recipe
I stumbled upon this idea during a lazy Sunday in my kitchen, craving something crunchy but homemade. It was a moment of frustration with the overly greasy store-bought chips that made me think—why not bake my own? That simple shift from frying to baking not only cut down on mess but gave me a new respect for the humble corn chip. Now, I keep a batch in my pantry, knowing I can whip up fresh, crispy chips whenever the craving hits, with no preservatives or excess oil involved.
Key Ingredient Tips
- Corn kernels: I use good-quality, fresh yellow corn for a naturally sweet flavor and vibrant color. Swap with blue or white corn if you want a different hue or flavor twist.
- Oil: I prefer a neutral oil like avocado or light olive oil for a crisp finish and subtle taste. If you want a slightly richer chip, try melted butter, but it may brown faster.
- Salt: I like sea salt flakes for a gentle crunch and clean saltiness. For a smoky touch, add a pinch of smoked paprika or chipotle powder.
- Spices and seasonings: I experiment with cumin, chili powder, or nutritional yeast to customize flavors. Keep it light or bold—your call, just sprinkle evenly.
- Corn flour (optional): I add a touch of corn flour to enhance crispness and texture. Skip if you prefer a more traditional, sturdier chip.
- Lime juice (optional): A splash of lime brightens the flavor and adds a fresh zing. Use fresh lime juice for the best aroma and tang.
- Water (if needed): I keep some on hand to help if the dough feels too dry or crumbly—just a teaspoon at a time, until it sticks together.
Spotlight on key ingredients
Corn kernels:
- I use fresh, yellow corn for a sweet, vibrant flavor. Swap with blue or white corn for a different twist.
- Oil: I prefer light olive or avocado oil for crispness and subtle taste. If you want a richer chip, try melted butter, but it browns faster.
- Salt: I like flaky sea salt for a gentle crunch and clean flavor. For smoky notes, add a pinch of smoked paprika or chipotle powder.
Oil:
- I choose neutral oils to keep the chips crisp and not greasy. Watch for smoke points during heating.
- Salt: Fine sea salt dissolves well and enhances flavor. Use coarse for a crunchier finish or skip for low-sodium versions.
Notes for ingredient swaps
- Dairy-Free: Swap butter for a neutral oil like avocado or light olive oil. The chips will be slightly less rich but still crispy.
- Gluten-Free: Use corn masa harina instead of all-purpose flour for the dough. It keeps the authentic corn flavor and texture.
- Low-Sodium: Reduce or omit added salt in the dough, and season with smoked paprika or nutritional yeast for flavor boost.
- Enhanced Flavor: Add a pinch of smoked paprika, chili powder, or cumin to the dough for a smoky or spicy kick.
- Vegan: Use plant-based oil (like coconut or sunflower) and skip any dairy ingredients—your chips will still turn out golden and tasty.
Equipment & Tools
- Baking sheet: To hold the chips during baking and ensure even heat exposure.
- Parchment paper or silicone mat: To prevent sticking and facilitate easy removal.
- Sharp knife or pizza cutter: To cut the dough into uniform chip shapes.
- Rolling pin: To roll out the dough evenly to about 1/8 inch thickness.
- Mixing bowl: To combine and mash the ingredients thoroughly.
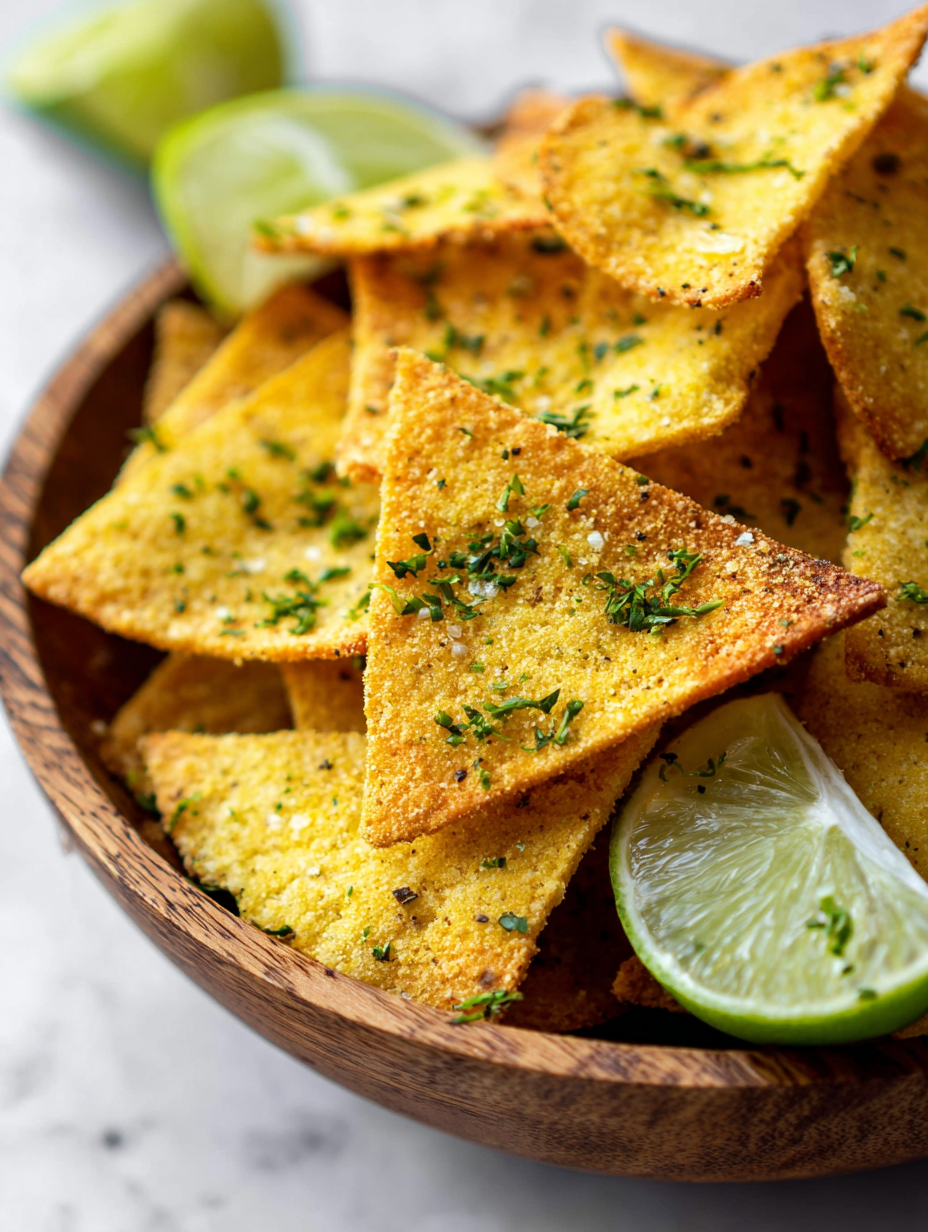
Step-by-step guide to baked corn chips
- Preheat your oven to 180°C (350°F). Line a baking sheet with parchment paper or a silicone mat. Gather a sharp knife, a rolling pin, and a mixing bowl.
- If using fresh corn, cook it until tender, then let it cool. For canned or frozen corn, drain and rinse thoroughly. Pat dry to remove excess moisture.
- In the mixing bowl, combine corn (about 2 cups), 1-2 tablespoons of oil, and a pinch of salt. Use a fork or masher to mash the mixture until mostly smooth, with some texture.
- Transfer the mixture onto a lightly floured surface. Roll out to about 1/8 inch thickness. If the dough feels sticky, sprinkle lightly with more flour.
- Using a sharp knife or pizza cutter, cut the dough into small triangles or your preferred chip shape. Keep them as uniform as possible for even baking.
- Arrange the cut chips in a single layer on the prepared baking sheet. Leave space between each for crisping. Lightly brush or spray with a little extra oil if desired.
- Bake in the preheated oven for 15-20 minutes. Check at 15 minutes; the edges should be golden and crispy. If they’re still soft, bake for a few more minutes, watching closely to prevent burning.
- Once baked, turn off the oven. Let the chips rest on the baking sheet for about 5 minutes; they’ll continue to crisp as they cool slightly. Transfer to a wire rack if needed.
- Finish with a light sprinkle of sea salt or your favorite seasoning while still warm. Allow to cool completely before storing.
Let the chips cool completely on a wire rack. Store in an airtight container at room temperature for up to 3 days. For extra crispness, re-bake at 150°C (300°F) for 5 minutes before serving.
How to Know It’s Done
- Edges are golden and crisp when you lift a chip.
- The chips crackle gently when broken or tapped.
- The chips hold their shape without bending or sagging.
Homemade Baked Corn Chips
Ingredients
Equipment
Method
- Cook the fresh corn kernels in boiling water until tender, then let them cool completely. If using canned or frozen corn, rinse and drain thoroughly, then pat dry to remove excess moisture. This step ensures your chips will crisp up nicely.
- Transfer the cooled corn to a mixing bowl. Add the oil and salt, then mash everything together with a fork or masher until the mixture is mostly smooth but still has some texture. This process helps form a cohesive dough-like base for your chips.
- Lightly flour a clean surface and transfer the mashed corn mixture onto it. Use a rolling pin to gently roll out the dough to about 1/8 inch thickness. Keep the dough even to ensure uniform baking and crispness.
- Use a sharp knife or pizza cutter to cut the rolled dough into small triangles or your preferred chip shape. Try to make the shapes as uniform as possible so they bake evenly and look pretty.
- Line your baking sheet with parchment paper or a silicone mat. Arrange the cut chips in a single layer on the sheet, leaving a little space between each. Lightly spray or brush the tops with a bit of oil for extra crispness.
- Bake the chips in a preheated oven at 180°C (350°F) for 15-20 minutes. Keep an eye on them around the 15-minute mark; they should turn golden and produce a gentle crackling sound when tapped. Remove once they’re crisp and golden brown.
- Let the baked chips rest on the baking sheet for about 5 minutes to cool and crisp up further. They’ll develop a beautiful golden color and a satisfying crunch.
- Transfer the chips to a wire rack or serve directly. Sprinkle with a little extra sea salt or your favorite seasonings while still warm for added flavor. Enjoy these fresh, crispy chips on their own or with your favorite dips!
Notes
Tips & Tricks for Perfect Chips
- Bolded Mini-Head: Use a light touch when rolling out dough; too much pressure can make chips uneven.
- Bolded Mini-Head: Keep an eye on the edges; they turn golden quickly, so check at 15 minutes to prevent burning.
- Bolded Mini-Head: Spray or brush lightly with oil before baking; this boosts crispness and promotes even browning.
- Bolded Mini-Head: For uniform chips, cut shapes as evenly as possible; inconsistent sizes bake unevenly.
- Bolded Mini-Head: Let baked chips rest on the tray for 5 minutes; they’ll crisp up as they cool, avoiding sogginess.
- Bolded Mini-Head: Use parchment paper or silicone mats to prevent sticking and facilitate easy removal after baking.
- Bolded Mini-Head: Taste-test your seasonings before adding; a pinch of salt or spice can make all the difference.
Common mistakes and how to fix them
- FORGOT to preheat oven → Always preheat for even baking and crispness.
- DUMPED dough too wet → Add a little more corn or flour to balance moisture.
- OVER-TORCHED chips → Reduce baking time or temperature to avoid burning.
- DIDN’T cut evenly → Use a ruler or guide for uniform shapes and even cooking.
Quick Fixes & Pantry Swaps
- When chips are soft, splash with a little water and return to oven briefly.
- If chips burn quickly, lower oven temperature or reduce baking time immediately.
- Dumped too much salt? Rinse and pat dry before baking again for less saltiness.
- Overcrowded baking sheet? Patch with smaller batches for even crisping and color.
- Shield chips with foil if edges brown too fast, then finish baking to prevent burning.
Prep, store, and reheat tips
- Prepping the dough: You can make the corn mixture a day ahead, keep it covered in the fridge for up to 24 hours—flavors deepen and it firms up for easier rolling.
- Storing baked chips: Cool completely before storing in an airtight container at room temperature. They stay crispy for up to 3 days, but are best enjoyed fresh.
- Freezing: For longer storage, freeze baked chips in a single layer in a zip-top bag for up to a month. Reheat in oven at 150°C (300°F) until crispy, about 5 minutes, until you hear a gentle crackle.
- Reheating tips: To revive crispness, re-bake chips at 150°C (300°F) for 5 minutes. Watch for that shimmer of oil and listen for the crackle—perfect snack again.
Top questions about baked corn chips
1. How can I tell when baked corn chips are done?
Look for chips that are golden around the edges, with a slight crackle when you tap them. They should feel firm and break crisply.
2. Why aren’t my chips crispy enough?
If they seem soft or bend easily, they need more time. Crispy, golden edges are your cue—check every few minutes after 15 min.
3. How do I get evenly shaped chips?
Use a sharp knife for even shapes and consistent baking. Uniform thickness helps them bake evenly and turn out crisp.
4. How should I store baked corn chips?
Store cooled chips in an airtight container at room temperature. Reheat at 150°C (300°F) for 5 minutes if they lose crunch.
5. Can I make these gluten-free or vegan?
Yes! Swap corn flour for masa harina or gluten-free flour if needed. Nothing beats the authentic corn flavor, but substitutions work well.
6. How can I customize the flavor?
Use smoked paprika or chipotle powder to add smoky flavor. For extra spice, sprinkle chili powder before baking or after for a kick.
7. What if my chips burn or brown unevenly?
If they brown too fast, lower the oven temp slightly or cover with foil mid-bake. Keep an eye at 15 minutes to prevent burning.
8. What kind of corn works best?
Use fresh, high-quality corn for vibrant flavor and color. Rinsing and drying the corn reduces moisture and helps chips crisp up.
9. Should I oil the chips before baking?
Lightly spray or brush with oil before baking. This helps chips crisp evenly and gives a golden, shiny finish.
10. Can I prepare the dough ahead of time?
Yes! Make the dough a day ahead, keep it refrigerated, then roll and bake. Flavors deepen, and it’s ready when you are.
Baked corn chips hold a special place in my snack rotation, especially when I want something crunchy without the grease. They remind me of lazy afternoons and simple pleasures, all with that satisfying snap and a hint of toasted corn aroma. Making them at home lately feels like reclaiming a little bit of mindful, homemade goodness.
Whenever I bake a batch, I’m struck by how versatile and forgiving this process is—seasonings, shapes, even the corn itself. It’s a reminder that great snacks don’t have to come from a bag; they can come straight from your oven, fresh and full of your own touch.