
Sometimes, the simplest ingredients can surprise you with their versatility. Lentils, for example, are usually reserved for soups or stews, but I’ve found they make a mean, crispy cutlet that’s perfect for a snack or light meal. It’s a way to turn humble pantry staples into something a little more special, without much fuss or fancy techniques.
What I love about these lentil cutlets is how honest they are—no hidden ingredients, just good, honest lentils mashed up with a few herbs, spices, and a bit of patience. They’re crispy on the outside, tender inside, and somehow feel both comforting and exciting at the same time. Plus, they’re endlessly adaptable if you want to tweak seasonings or add a surprise ingredient.
Making these is like reclaiming a little bit of kitchen creativity. It’s about transforming everyday lentils into something that feels a bit more indulgent—crisp, golden, and just a little bit addictive. These cutlets are perfect for when you want a quick bite that’s satisfying but doesn’t require a whole lot of prep or fuss.
Focusing on transforming humble lentils into a comforting, crispy snack that bridges the gap between everyday meal and irresistible finger food. This recipe is about reclaiming simplicity with a crunch, perfect for sharing or a quick bite that feels special without fuss.
Turning humble lentils into crispy bites
- I love how these lentil cutlets remind me of childhood snacks, crispy and golden from the pan.
- There’s a quiet pride in turning simple pantry staples into something so satisfying and shareable.
- I get a little thrill when I hear that satisfying crackle as they hit the skillet, signaling crispy perfection.
- Sometimes, I feel like these are my secret weapon—easy to make, but they taste like a special treat.
Turning humble lentils into crispy bites
- This recipe was born out of a lazy weekend when I had a handful of lentils sitting in the pantry and a craving for something crispy and satisfying. I wanted to create a snack that felt a bit indulgent but didn’t require a trip to the store or complicated techniques. The idea was to transform humble lentils into something that could be both a meal and a finger food, all in one go.
- I remember experimenting in my tiny kitchen, trying to get that perfect crunch without deep frying. After a few burnt batches and too-soft mishaps, I finally cracked the code—getting a crispy exterior with tender insides, just how I like it. It’s funny how simple ingredients can take on a new life when you give them enough love and patience.
- heading:
Historical & Cultural Roots
- Lentil cutlets have roots in Middle Eastern and Indian vegetarian cuisines, where legumes are a staple for hearty, plant-based dishes.
- Historically, turning lentils into patties was a way to stretch ingredients and create satisfying, portable meals for traveling or workdays.
- This recipe echoes old peasant traditions of frying or baking pulses into crispy snacks—simple, affordable, and full of flavor.
- In recent years, these cutlets have gained popularity in modern vegetarian menus as a versatile, fiber-rich finger food.
Key ingredients and tips
- Green lentils: I like their earthy flavor and firm texture, which holds up well in the cutlets. If you prefer milder taste, try red lentils for a softer bite.
- Breadcrumbs: I use panko for extra crunch, but regular fine breadcrumbs work fine if you want fewer carbs or a softer crust. Toast them lightly for a golden color and deeper flavor.
- Onion and garlic: These add a savory punch that balances the lentils’ earthiness. If you’re in a rush, onion powder and garlic powder can stand in—just adjust the quantities.
- Herbs and spices: I usually toss in cumin, coriander, and a pinch of chili flakes for warmth and depth. Feel free to swap in smoked paprika or fresh herbs like cilantro for variation.
- Binding agents: Eggs help hold everything together, but if you’re vegan, mashed sweet potato or a flaxseed slurry can do the trick—just expect a slightly different texture.
- Oil for frying: I prefer neutral oils like vegetable or canola for crispness, but a splash of sesame oil adds a toasty aroma if that’s your vibe. Keep the heat moderate to prevent burning.
- Lemon juice or vinegar: I add a squeeze of lemon at the end for brightness, which cuts through the richness. You can also try a splash of apple cider vinegar for a tangy twist.
Spotlight on key ingredients
Green lentils:
- I love their earthy flavor and firm texture, which holds up well in the cutlets. If you prefer milder taste, try red lentils for a softer bite.
- Breadcrumbs: I use panko for extra crunch, but regular fine breadcrumbs work fine if you want fewer carbs or a softer crust. Toast them lightly for a golden color and deeper flavor.
Herbs and spices:
- Onion and garlic: These add a savory punch that balances the lentils’ earthiness. If you’re in a rush, onion powder and garlic powder can stand in—just adjust the quantities.
- I usually toss in cumin, coriander, and a pinch of chili flakes for warmth and depth. Feel free to swap in smoked paprika or fresh herbs like cilantro for variation.
Notes for ingredient swaps
- Dairy-Free: Swap eggs for mashed avocado or a flaxseed slurry. Expect a slightly denser, less crisp texture.
- Gluten-Free: Use gluten-free breadcrumbs or crushed rice crackers. The crunch will be a tad different but still satisfying.
- Vegan: Replace eggs with a mixture of mashed sweet potato and a pinch of tapioca starch. Keep an eye on moisture levels.
- Herb Variations: Fresh cilantro or parsley can replace dried herbs for a brighter, fresher flavor.
- Spice Level: Adjust chili flakes or swap for smoked paprika for a smoky kick. Be mindful of spice heat if sensitive.
- Lentil Type: Red lentils cook faster and become softer, giving a more tender, almost melt-in-your-mouth bite.
- Oil Choice: Use sesame or coconut oil for added aroma—these oils impart a different flavor but work equally well for crisping.
Equipment & Tools
- Large skillet: For frying the cutlets to crispy perfection.
- Mixing bowl: To combine and shape the lentil mixture.
- Spoon and spatula: For mixing and flipping the cutlets.
- Pot: To cook the lentils until tender.
Step-by-step guide to lentil cutlets
- Gather your equipment: a large skillet, a mixing bowl, a spoon, and a spatula. Preheat the skillet over medium heat (about 160°C/320°F).
- Cook the lentils: Rinse 1 cup of green lentils. In a pot, add lentils and 3 cups of water. Bring to a boil, then simmer for 20 minutes until tender but firm. Drain excess water and let cool slightly.
- Mash the lentils: Transfer lentils to a large bowl. Use a fork or potato masher to mash until mostly smooth with some texture remaining. Avoid over-mashing to keep some bite.
- Add flavorings: Mix in 1 finely chopped onion, 2 minced garlic cloves, 1 teaspoon cumin, ½ teaspoon coriander, and salt to taste. Stir in ¼ cup breadcrumbs to help bind. If mixture feels too loose, add a bit more breadcrumbs.
- Form the cutlets: Shape the mixture into 4-6 patties, about 1 inch thick. Keep them uniform for even cooking. If the mixture cracks, add a teaspoon of water or a little more breadcrumbs.
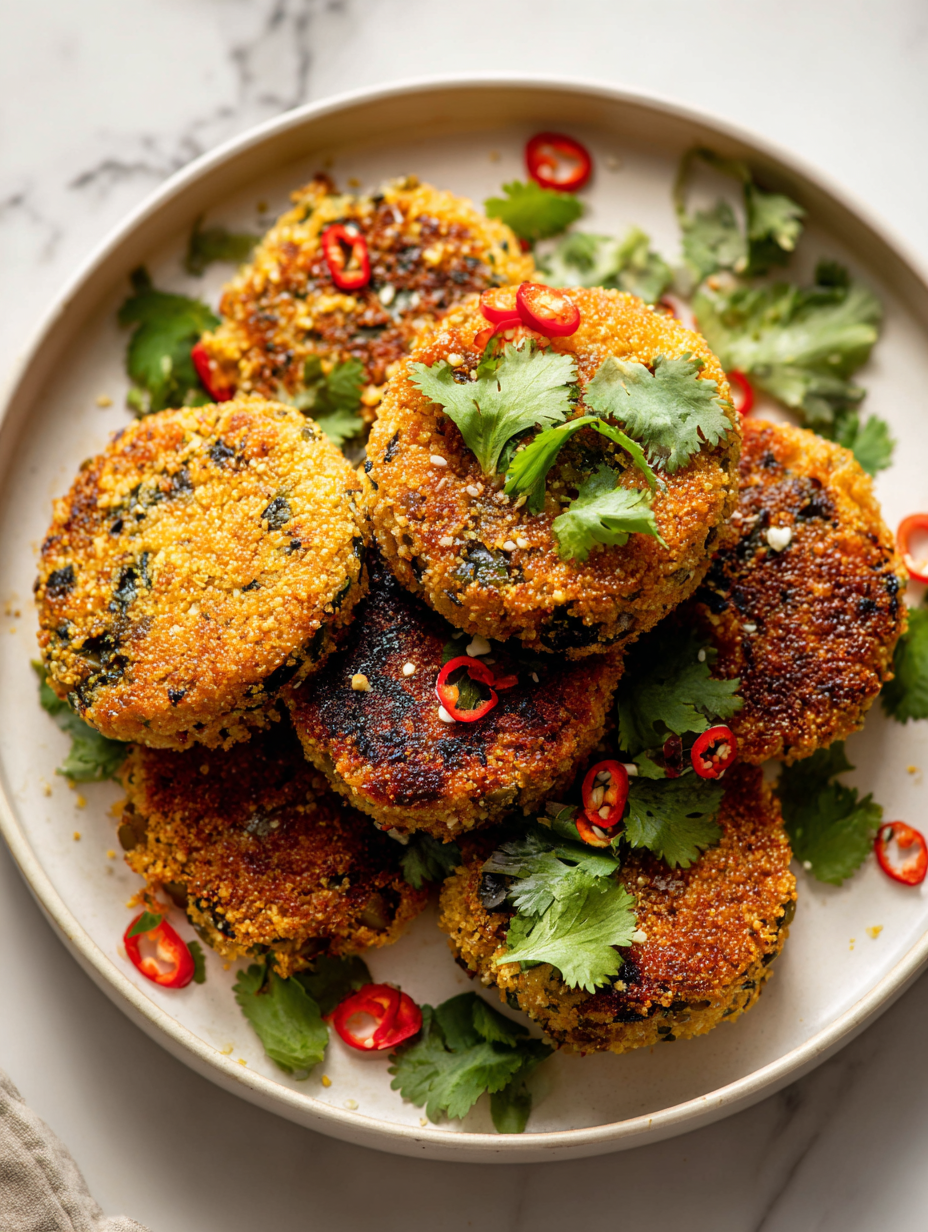
- Cook the cutlets: Lightly oil the skillet. Place cutlets in the hot pan. Cook for 4–5 minutes per side, until golden brown and crispy. The edges should be crispy, and they should emit a fragrant, toasted smell.
- Check for doneness: The exterior should be crispy and golden, with a slight jiggle in the center. The cutlets should hold together without falling apart. If they stick or break, adjust cooking time or chill briefly before frying again.
- Rest and serve: Transfer cooked cutlets to a paper towel-lined plate. Let rest for 2 minutes. Serve hot, with a squeeze of lemon or your favorite dipping sauce.
Let the cutlets rest for 2 minutes on a paper towel-lined plate. Serve immediately with lemon wedges or your preferred sauce. They’re best enjoyed warm and crispy.
How to Know It’s Done
- Exterior is golden and crispy, with a fragrant aroma.
- Center feels firm but slightly yielding when pressed.
- Cutlet holds together when flipped and moved in the pan.
Crispy Lentil Cutlets
Ingredients
Equipment
Method
- Rinse the green lentils thoroughly and add them to a pot with water. Bring to a boil, then reduce heat and simmer for about 20 minutes until tender but still firm. Drain any excess water and let them cool slightly.
- Transfer the cooked lentils to a large mixing bowl. Use a fork or potato masher to mash until mostly smooth, leaving some texture for a hearty bite.
- Add finely chopped onion, minced garlic, cumin, coriander, and chili flakes to the mashed lentils. Mix well to evenly distribute the spices and flavorings.
- Stir in the beaten egg and breadcrumbs. The mixture should be firm enough to hold its shape. If it's too loose, add a little more breadcrumbs; if too dry, add a splash of water.
- Form the mixture into 4 to 6 evenly sized patties, about 1 inch thick, pressing firmly to compact them.
- Heat oil in a large skillet over medium heat until shimmering and fragrant. Carefully place the patties in the skillet, ensuring not to overcrowd the pan.
- Cook the patties for about 4–5 minutes on each side, until they are golden brown and crispy on the outside, with a pleasant crackling sound as they fry.
- Once cooked, transfer the cutlets to a paper towel-lined plate to drain excess oil and rest for a minute.
- Squeeze fresh lemon juice over the hot cutlets to add brightness and serve immediately while crispy and warm.
Notes
Pro tips for perfect lentil cutlets
- Bolded: Use a non-stick skillet for easier flipping and less sticking.
- Bolded: Keep the heat moderate to prevent burning the crust before the inside cooks.
- Bolded: Chill the formed cutlets for 10 minutes if the mixture feels too soft to shape properly.
- Bolded: When frying, don’t overcrowd the pan; work in batches for even crispness.
- Bolded: Use a gentle touch when flipping to keep the shape intact and avoid crumbling.
- Bolded: For extra crunch, toss the cutlets in panko breadcrumbs before frying.
- Bolded: Drain on paper towels immediately after frying to keep them crispy and prevent sogginess.
Common mistakes and how to fix them
- FORGOT to preheat the skillet → Do this before forming cutlets for even crispness.
- DUMPED too much oil → Use moderate heat to prevent burning and ensure crispy exterior.
- OVER-TORCHED the first batch → Reduce heat slightly and watch for golden color, not dark brown.
- MISSED resting time → Rest cutlets for 2 minutes to set the shape and improve texture.
Quick fixes and pantry swaps
- When mixture feels too loose → Chill for 10 minutes to firm up before shaping.
- If cutlets stick to pan → Splash a little water in the skillet to loosen them gently.
- Over-browned exterior → Reduce heat immediately and finish in the oven at 180°C.
- DUMPED too much oil → Blot with paper towel to absorb excess and keep crisp.
- Splash lemon juice at the end → Brightens flavor and cuts through richness, even if you forget earlier.
Prep, store, and reheat tips
- You can prep the lentil mixture a day in advance; keep it covered in the fridge for up to 24 hours, and you’ll notice the flavors meld and the mixture firms up nicely, making shaping easier.
- Shape the cutlets ahead of time, then refrigerate on a plate covered with plastic wrap. They can stay chilled for up to 12 hours without losing texture, ready for quick frying.
- Cooked cutlets reheat well in a hot skillet or oven. For the skillet, about 3-4 minutes per side over medium heat; in the oven, 180°C/350°F for 10 minutes until warmed and crispy again. Expect a fragrant crunch and hot, tender insides.
- Store leftovers in an airtight container in the fridge for up to 3 days. Reheat until sizzling and fragrant, with a slight crackle as they crisp up again.
- Freezing cooked or uncooked cutlets is fine—wrap tightly in plastic or foil. They can last up to a month in the freezer. Reheat directly from frozen, adding a minute or two, until warmed through and crispy.
Top questions about lentil cutlets
1. Can I use canned lentils for this recipe?
Use cooked, mashed lentils that are soft but still hold their shape. They give the cutlets a hearty, earthy flavor and a tender interior.
2. Can I use canned lentils instead of dried?
Yes, drain and rinse canned lentils thoroughly, then mash them well. Adjust the seasoning since canned lentils are often more salted.
3. My mixture is too wet. What do I do?
Make sure the mixture is firm enough to shape—if it’s too sticky, add a little more breadcrumbs; if too dry, a splash of water or oil helps.
4. How do I know when the cutlets are cooked?
Cook the cutlets over medium heat until golden and crispy, about 4-5 minutes per side. They should emit a fragrant, toasted smell when ready.
5. Can I use different breadcrumbs?
Use panko breadcrumbs for a crunchier crust, but regular fine breadcrumbs will work if you prefer a softer exterior.
6. Can I bake these instead of frying?
Yes, you can bake the cutlets at 180°C/350°F for about 15 minutes or until golden if you prefer baking over frying.
7. How do I reheat leftover cutlets?
Reheat in a hot skillet for 3-4 minutes per side until sizzling and crispy, or in an oven at 180°C/350°F for 10 minutes.
8. Can I make these ahead of time?
You can prepare the lentil mixture and shape the cutlets ahead of time, then refrigerate for up to 24 hours before frying.
9. My mixture is too soft to shape.
If the mixture feels too loose, chill it for 10 minutes or add more breadcrumbs to help it hold together during frying.
10. Can I make these vegan?
For a vegan version, replace eggs with a flaxseed slurry or mashed sweet potato to help bind the mixture.
These lentil cutlets aren’t just about crunch and comfort; they’re a reminder that simple ingredients can surprise you. Each crispy bite carries a bit of nostalgia, a bit of kitchen experimenting, and a whole lot of honest flavor. They’re perfect for when you want something quick, satisfying, and a little bit special.
Whenever I make these, I think about how humble lentils can be transformed into something that feels like a treat. It’s a dish that’s easy to love, adaptable, and always satisfying—whether as a snack or part of a casual meal. And honestly, that’s a pretty good reason to keep them on hand.