
Sweet potato chips are a favorite in my house, but I’ve always been frustrated with how they turn out—sometimes soggy, sometimes burnt, never quite right. It wasn’t until I started experimenting with thin slicing and precise oven temps that I finally cracked the code for crisp, oven-baked chips that actually hold their crunch. This recipe is a game-changer for anyone craving a healthier snack that doesn’t compromise on texture.
What I love about these baked sweet potato chips is how simple they are to make, yet they feel like a real treat. No deep-frying mess, no greasy fingers—just a quick slice, a splash of olive oil, and a hot oven doing all the work. They’re perfect for snacking straight from the tray or tossing into a salad for that satisfying crunch.
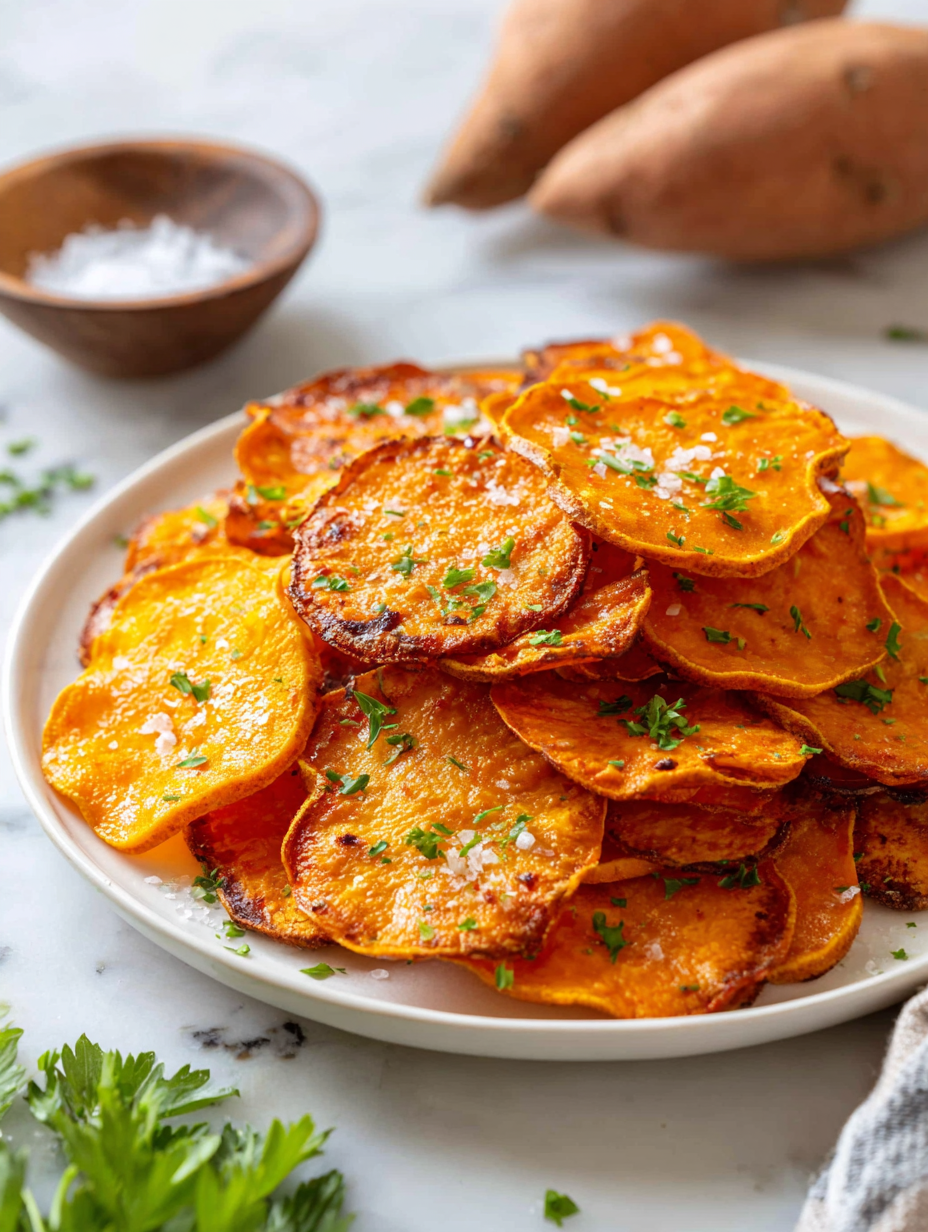
Focusing on the surprisingly crisp texture achievable from sweet potatoes without frying, highlighting the importance of precise oven temperature and thin slicing for perfect homemade chips.
The story behind this recipe
I first stumbled upon the idea of baking sweet potato chips when I was trying to find a less oily snack for my kids. The kitchen smelled of caramelized edges and roasted sweetness, which was a far cry from the greasy bags we usually grab. Over time, I tweaked the thickness and oven temp, chasing that elusive perfect crunch—thin enough to crisp, but not so thin they burn instantly. Now, these chips are a regular in my snack rotation, reminding me that simple ingredients and patience can make magic happen.
Ingredient breakdown: key components
- Sweet potatoes: I prefer organic, dense, and firm ones with deep orange flesh—sweeter and more vibrant when sliced thinly. Swap with yams if you like a slightly more starchy bite.
- Olive oil: Just a light drizzle adds a subtle fruity aroma and helps crisp the edges. You could use avocado oil for a milder, neutral flavor that still crisps up nicely.
- Salt: I like a good pinch of flaky sea salt to enhance sweetness and add crunch. For a smoky twist, sprinkle smoked paprika instead, which gives a lovely depth.
- Black pepper: Freshly ground pepper brings a mild heat and sharpness. Skip it or swap with a pinch of cayenne for extra kick if you like spicy snacks.
- Optional spices: A dash of cinnamon or cumin can add warmth and complexity. Use sparingly—these are sweet potato chips, after all, not spice bombs.
- Parchment paper: It’s essential for preventing sticking and ensuring even crispness. Silicone mats work too, especially if you bake in batches frequently.
- Baking sheet: A rimmed tray allows hot air to circulate around the slices, promoting uniform crisping. Use a smaller sheet for a more concentrated, oven-toasted effect.
Spotlight on key ingredients
Sweet potatoes:
- I prefer organic, dense, and firm ones with deep orange flesh—sweeter and more vibrant when sliced thinly. Swap with yams if you like a slightly more starchy bite.
- Olive oil: Just a light drizzle adds a subtle fruity aroma and helps crisp the edges. You could use avocado oil for a milder, neutral flavor that still crisps up nicely.
- Salt: I like a good pinch of flaky sea salt to enhance sweetness and add crunch. For a smoky twist, sprinkle smoked paprika instead, which gives a lovely depth.
Spices & seasonings:
- Black pepper: Freshly ground pepper brings a mild heat and sharpness. Skip it or swap with a pinch of cayenne for extra kick if you like spicy snacks.
- Optional spices: A dash of cinnamon or cumin can add warmth and complexity. Use sparingly—these are sweet potato chips, after all, not spice bombs.
Notes for ingredient swaps
- Sweet potatoes: I prefer organic, dense, and firm ones with deep orange flesh—sweeter and more vibrant when sliced thinly. Swap with yams if you like a slightly more starchy bite.
- Olive oil: Just a light drizzle adds a subtle fruity aroma and helps crisp the edges. You could use avocado oil for a milder, neutral flavor that still crisps up nicely.
- Salt: I like a good pinch of flaky sea salt to enhance sweetness and add crunch. For a smoky twist, sprinkle smoked paprika instead, which gives a lovely depth.
- Black pepper: Freshly ground pepper brings a mild heat and sharpness. Skip it or swap with a pinch of cayenne for extra kick if you like spicy snacks.
- Optional spices: A dash of cinnamon or cumin can add warmth and complexity. Use sparingly—these are sweet potato chips, after all, not spice bombs.
- Parchment paper: It’s essential for preventing sticking and ensuring even crispness. Silicone mats work too, especially if you bake in batches frequently.
- Baking sheet: A rimmed tray allows hot air to circulate around the slices, promoting uniform crisping. Use a smaller sheet for a more concentrated, oven-toasted effect.
Equipment & Tools
- Chef’s knife or mandoline: For slicing sweet potatoes very thin and uniformly.
- Large mixing bowl: To toss slices with oil evenly.
- Rimmed baking sheet: To hold the slices and facilitate even baking.
- Parchment paper: Prevent sticking and promote crisping.
- Tongs: To handle hot chips safely during removal.
Step-by-step guide to baked chips
- Equip your workspace: a sharp chef’s knife for thin slicing, a large bowl for tossing, and a rimmed baking sheet lined with parchment paper for even baking.
- Preheat your oven to 200°C (390°F). Ensure the rack is in the middle for uniform heat.
- Peel the sweet potatoes if you prefer a smoother chip, or leave the skins on for texture and nutrients. Slice very thin, about 1/16 inch, using a sharp knife or mandoline for consistency.
- Place the slices in a large bowl. Drizzle with 1-2 tablespoons of olive oil. Toss gently to coat each slice evenly without breaking them.
- Spread the slices in a single layer on the prepared baking sheet. Overlapping or crowding will steam instead of crisp, so give each slice space.
- Bake for about 15-20 minutes. Check around the 12-minute mark. They should be golden at the edges, with some darker spots for flavor. If edges brown too fast, lower the oven temp slightly or rotate the sheet.
- Once they reach a crisp, golden hue and smell roasted with a hint of sweetness, remove from oven. They should crackle when you lift them with tongs.
- Let the chips rest on the sheet for 5 minutes. They will crisp up further as they cool. Transfer to a wire rack if you want them extra crisp.
- Taste and sprinkle with a pinch of flaky sea salt while still warm. Serve immediately or store for later.
Let the chips rest on the baking sheet for 5 minutes to firm up. Transfer to a plate, sprinkle with salt, and serve warm or at room temperature.
How to Know It’s Done
- Edges are golden and slightly darker, with a crackling sound when moved.
- The chips are firm and snap easily when broken, indicating crispness.
- No soggy or greasy patches; they feel dry and light, not limp or oily.
Oven-Baked Sweet Potato Chips
Ingredients
Equipment
Method
- Begin by preheating your oven to 200°C (390°F) and lining a rimmed baking sheet with parchment paper.
- Using a sharp mandoline or knife, thinly slice the sweet potatoes to about 1/16 inch thick—aim for uniform slices for even crisping.
- Transfer the slices to a large mixing bowl and drizzle with a tablespoon of olive oil. Toss gently to coat each slice evenly, ensuring they don't break.
- Arrange the slices in a single layer on the prepared baking sheet, leaving space between each to allow hot air circulation.
- Bake in the oven for about 15-20 minutes, rotating the sheet halfway through. Keep an eye on the edges—they should turn golden and crispy, with a slight crackling sound as they bake.
- Once the chips are golden at the edges and feel firm and crisp when gently lifted with tongs, remove them from the oven.
- Let the chips rest on the baking sheet for about 5 minutes to firm up further, then transfer to a plate or wire rack.
- Sprinkle the warm chips with flaky sea salt and, if desired, a pinch of smoked paprika or black pepper for extra flavor.
- Serve immediately for the best crunch, or store in an airtight container at room temperature for up to 2 days. Reheat in a hot oven for a few minutes to regain crispness if needed.
Notes
Pro tips for perfect baked chips
- Bolded mini-head: Thin slices are key → Use a mandoline or very sharp knife for uniform thickness.
- Bolded mini-head: Watch the edges → When they turn golden and crackle, they’re ready to come out.
- Bolded mini-head: Don’t overcrowd the pan → Leave space between slices for even crisping.
- Bolded mini-head: Flip if needed → Rotate the baking sheet halfway to prevent uneven browning.
- Bolded mini-head: Lower oven temp for darker chips → If edges brown too fast, reduce to 190°C (375°F).
- Bolded mini-head: Rest for crunch → Let chips sit 5 minutes on the baking sheet to firm up.
- Bolded mini-head: Store in an airtight container → Keep away from humidity to maintain crispness.
Common mistakes and how to fix them
- TOO THICK SLICES: They won’t crisp well. Use a mandoline for even thin slices.
- OVERLAPPING SLICES: Crowding causes steaming. Space them out on the baking sheet.
- BAKING AT WRONG TEMP: Too high burns edges; too low undercooks. Stick to 200°C (390°F).
- IGNORING COLOUR CHANGES: Golden edges and crackling sound indicate crispness. Watch closely near the end.
Quick fixes and pantry swaps
- If slices stick, splash with a little more oil before baking.
- When chips are soggy, increase oven temp slightly or bake a few minutes longer.
- DUMPED slices too thick? Use a mandoline for consistent thinness.
- Over-torched edges? Lower the oven temperature or rotate the sheet mid-bake.
- Shield burnt spots with foil and extend baking time for even crispness.
Prep, store, and reheat tips
- Slice the sweet potatoes ahead of time; store in an airtight container in the fridge for up to 24 hours. Keep slices crisp and avoid moisture. The edges might soften slightly, but they’ll crisp up again in the oven.
- You can bake the chips in advance and keep them at room temperature in an airtight container for 1-2 days. They may lose some crunch but still taste great with a quick reheat.
- Reheat in a 180°C (355°F) oven for 3-5 minutes until warmed and crispy again. Watch for bubbling and a fragrant aroma as signs they’re ready.
- Avoid refrigerating the baked chips for too long, as moisture can make them soggy. Best enjoyed fresh or within a day for optimal crunch.
- For longer storage, freeze baked chips in a sealed container for up to a week. Reheat directly from frozen for best crispness, adding a minute or two to baking time.
FAQs about Baked Sweet Potato Chips
1. Can I use yams instead of sweet potatoes?
Sweet potatoes tend to be denser and moister than yams, which can affect crispness. Use firm, deep orange ones for the best crunch.
2. Do I need special tools for slicing?
A mandoline helps get slices very thin and even, which is crucial for crisp chips. A sharp knife works too if careful.
3. How do I know when the chips are done?
Bake at 200°C (390°F) until edges are golden and crackling. Usually about 15-20 minutes, but watch closely near the end.
4. Can I skip the parchment paper?
Use parchment paper to prevent sticking and promote even crispness. Silicone mats are a good alternative if you prefer reusable options.
5. How thin should the slices be?
Thin slices ensure crispiness. Thicker slices may turn out soggy or chewy, so aim for about 1/16 inch thickness.
6. How long do baked chips stay crispy?
Store leftovers in an airtight container at room temperature for up to 2 days. Reheat in the oven for a few minutes to restore crunch.
7. My chips are burning too fast, what should I do?
Adjust oven rack placement or slightly lower temperature if edges brown too quickly. Keep an eye on them as they bake.
8. When should I add salt or spices?
Sprinkle with flaky sea salt while warm for maximum flavor enhancement. Add spices like smoked paprika for extra depth.
9. Can I freeze these chips?
Yes, you can freeze baked chips in a sealed container for up to a week. Reheat directly from frozen to regain crispness.
10. My chips are soggy after baking, how do I fix it?
If they turn soggy, increase oven temp slightly or extend baking time. For a quick fix, re-crisp in a hot oven for a few minutes.
These baked sweet potato chips are a simple, honest snack that delivers a satisfying crunch without the oil. They remind me that a few careful steps—thin slicing, controlled heat—can turn humble ingredients into something special.
Whenever I make these, I feel a little proud of how easy it is to get that perfect balance of crispy and tender. They’re a reminder that good snacks don’t have to be complicated or greasy, just thoughtfully prepared. Sometimes, the simplest treats are the most memorable.