
Chickpea patties are my go-to whenever I want something quick, filling, and endlessly customizable. I love how a simple can of chickpeas can turn into something crispy on the outside and tender inside, filled with whatever spices I have on hand. It’s like a blank canvas that invites me to experiment, whether I’m feeling smoky cumin or bright lemon and herbs.
What keeps me coming back to this recipe is its versatility. They work just as well served with a dollop of tangy yogurt, stuffed into a pita, or topped with a spicy chutney. Plus, they’re forgiving—if you mess up the shape or the spice blend, you can always tweak it on the fly. It’s honest, casual cooking that feels satisfying and creative at the same time.
Focusing on how chickpea patties can serve as a versatile canvas for exploring global spice blends, turning a simple vegetarian staple into a flavorful, customizable meal that sparks creativity in the kitchen.
Global Spice Adventure
- I love how chickpeas can surprise me—crispy exterior, tender inside, seasoned just right, and always satisfying.
- There’s a nostalgic rush when I remember making these with my grandma’s spice blend in her tiny kitchen.
- Sometimes I get overwhelmed by too many ingredients, but these patties remind me that simplicity often wins.
The story behind this recipe
- Making these chickpea patties is a bit of a ritual for me. I remember the first time I threw some spices into mashed chickpeas and ended up with something that was crispy and warm, almost like a little patty of comfort. It’s funny how a humble can of chickpeas can turn into something so satisfying, especially when I’m short on time but craving flavor.
- The real inspiration came from those lazy weekends when I had a handful of spices and a bowl of chickpeas, and I wanted to create something that felt both simple and a bit special. Over the years, these patties have become my quick fix—something I throw together without too much fuss, but that always makes me smile. They remind me that good eating doesn’t have to be complicated or perfect, just honest and tasty.
- heading:
Historical & Cultural Tidbits
- These chickpea patties have roots in Middle Eastern mezze plates, where they evolved as a vegetarian option packed with herbs and spices.
- Historically, similar recipes appeared in Mediterranean cuisines, often fried and served with tangy yogurt or tahini sauce.
- The versatility of chickpeas made them a staple for resourceful cooks, turning pantry staples into hearty, protein-packed snacks.
- In recent years, these patties have gained popularity in plant-based food circles, thanks to their satisfying texture and customizable flavor.
Ingredient breakdown
- Chickpeas: I love using canned chickpeas—they mash easily and stay tender inside, but dried and cooked chickpeas give a nuttier flavor.
- Fresh herbs: Parsley or cilantro add brightness and freshness. If I don’t have fresh, dried herbs are okay but less vibrant.
- Spices: Cumin and smoked paprika are my go-tos—they bring warmth and depth, especially when toasted briefly in the pan before mixing.
- Binding agent: Eggs work perfectly for a firm, cohesive patty, but if you’re vegan, try flaxseed meal mixed with water for a similar texture.
- Breadcrumbs: I prefer panko for crunch, but regular breadcrumbs work fine—just watch they don’t soak up too much moisture and make the patties mushy.
- Lemon juice: Brightens everything up and balances the spices. Skip it if you want a softer, earthier flavor, but it makes a big difference.
- Salt and pepper: Don’t skimp—season generously. The right amount of salt makes all the spices pop and keeps the flavor lively.
Spotlight on Key Ingredients
Chickpeas:
- I love using canned chickpeas—they mash easily and stay tender inside, but dried and cooked chickpeas give a nuttier flavor.
- There’s a richness to the chickpeas that becomes almost creamy when mashed well, and they hold their shape nicely during frying.
Fresh herbs:
- Parsley or cilantro add brightness and freshness. If I don’t have fresh, dried herbs are okay but less vibrant.
- The aroma of fresh herbs just before mixing lifts the whole dish, and they add a subtle, herbaceous punch that wakes up the palate.
Notes for ingredient swaps
- Dairy-Free: Use mashed avocado or hummus instead of yogurt for creaminess, but expect a milder flavor.
- Gluten-Free: Swap breadcrumbs for ground almonds or gluten-free panko—both add a nutty note and crunch.
- Vegan: Replace eggs with flaxseed meal mixed with water; it binds just as well but has a slightly nuttier taste.
- Fresh Herbs: If out of parsley or cilantro, try basil or mint for a different, refreshing aroma.
- Lemon Juice: Use lime or vinegar if lemon isn’t available—both brighten the flavor without changing the profile too much.
- Spices: Smoked paprika can be replaced with chipotle powder for a deeper smoky kick, but reduce other smoky elements.
- Chickpeas: Dried and cooked chickpeas can be used if you soak and cook them ahead, offering a nuttier, more robust flavor.
Equipment & Tools
- Large mixing bowl: Combine and mix ingredients evenly.
- Cast iron skillet: Achieve even heat and crispiness.
- Spatula: Flip and handle the patties carefully.
- Plate: Rest and serve the cooked patties.
Step-by-step guide to chickpea patties
- Gather your equipment: a large mixing bowl, a skillet (preferably cast iron), a spatula, and a plate for resting. Preheat the skillet over medium heat (~180°C / 350°F).
- Drain and rinse a can of chickpeas. Pat dry with a paper towel to remove excess moisture. Mash them roughly with a fork or potato masher, leaving some texture.
- In the bowl, add chopped fresh herbs, spices (cumin, paprika), a squeeze of lemon, a beaten egg, and a handful of panko breadcrumbs. Mix until well combined. If the mixture feels too wet, sprinkle in more breadcrumbs; if too dry, add a splash of water or olive oil.
- Form the mixture into 4-6 patties, about 1 inch thick. Keep them uniform for even cooking.
- Place the patties onto the hot skillet. Cook for about 4-5 minutes per side, until they’re golden-brown and crispy. Use a spatula to gently lift and check the underside. If they’re sticking, give them a little more time or shake the pan gently.
- For the first flip, gently turn the patties. You want a crisp, brown crust—if they crack, they need a bit more cooking time. Adjust the heat if they brown too quickly or slowly.
- Once cooked, transfer to a plate and let rest for 2 minutes. This helps the structure set and prevents breaking when serving.
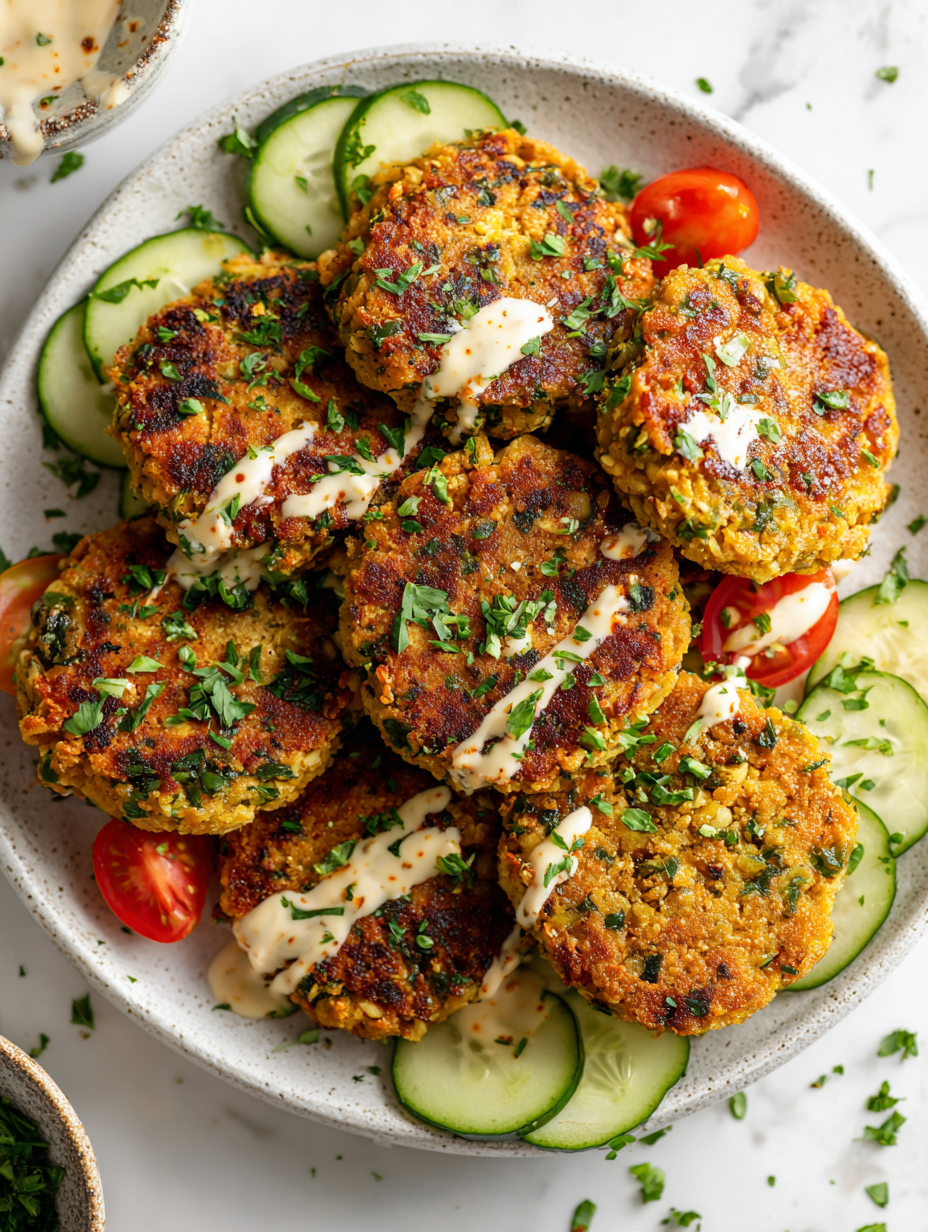
- Serve with a dollop of yogurt, a squeeze of lemon, or atop a salad. Plate hot with a bit of fresh herbs for garnish.
Let the patties rest for 2 minutes off heat. Serve immediately with your favorite toppings or sides. Garnish with fresh herbs for a bright touch.
How to Know It’s Done
- The patties should be golden and crispy on the outside.
- They shouldn’t fall apart when flipped—use gentle handling.
- A slight jiggle in the center indicates they are cooked through but tender inside.
Versatile Chickpea Patties
Ingredients
Equipment
Method
- Gather your equipment: a large mixing bowl, a cast iron skillet, a spatula, and a plate. Preheat the skillet over medium heat until hot and slightly shimmering.
- Drain and rinse a can of chickpeas, then pat them dry with a paper towel to remove excess moisture. Use a fork or potato masher to roughly mash the chickpeas, leaving some texture for a hearty bite.1 can 14 oz canned chickpeas
- Add the chopped fresh herbs, toasted cumin and smoked paprika, lemon juice, and beaten egg to the mashed chickpeas. Mix everything together until well combined and fragrant.1/4 cup fresh parsley or cilantro, 1 teaspoon ground cumin spice blend, 1 teaspoon smoked paprika spice blend, 1 tablespoon lemon juice lemon juice, 1 egg
- Stir in the breadcrumbs gradually, mixing until the mixture holds together but isn’t too sticky. If it feels wet, add a few more breadcrumbs; if dry, add a splash of water or lemon juice.1/4 cup panko breadcrumbs breadcrumbs
- Divide the mixture into 4-6 equal portions and gently shape each into a patty about 1 inch thick with your hands. Place them on a plate ready for frying.
- Carefully place the patties onto the preheated skillet. Cook for about 4-5 minutes on the first side, until the edges are golden and crispy, then gently flip with a spatula.
- Cook the second side for another 4-5 minutes, until evenly browned and crispy all over. Adjust the heat as needed to prevent burning.
- Use a spatula to transfer the cooked patties onto a plate. Let them rest for 2 minutes to set their structure and prevent crumbling.
- Serve the chickpea patties hot, topped with a dollop of yogurt, a squeeze of lemon, and chopped herbs for extra flavor and freshness.
Notes
Pro tips for perfect chickpea patties
- Bolded Mini-Head: Use a fork to mash chickpeas—leave some texture for better bite.
- Bolded Mini-Head: Toast spices briefly in the pan before mixing—boosts aroma and flavor.
- Bolded Mini-Head: Chill the mixture for 15 minutes—helps the patties hold shape during frying.
- Bolded Mini-Head: When flipping, gently lift edges first—avoids breaking delicate patties.
- Bolded Mini-Head: Use a non-stick skillet for easier handling and less oil absorption.
- Bolded Mini-Head: Rest cooked patties for a few minutes—sets the structure and prevents crumbling.
- Bolded Mini-Head: For extra crispiness, brush patties with a little oil before final fry—shimmer and crunch.
Common mistakes and how to fix them
- FORGOT to dry chickpeas → They won’t mash smoothly, dry thoroughly before mixing.
- DUMPED too much oil in pan → Use moderate heat to prevent burning and sticking.
- OVER-TORCHED patties → Reduce heat if they brown too quickly, cook until crispy but not burnt.
- MISSED resting time → Let patties rest 2 minutes for better structure and handling.
Quick fixes and pantry swaps
- When patties fall apart, splash in a little more flour or breadcrumbs to bind better.
- If patties are soggy, blot with a paper towel, then cook a bit longer for crispness.
- DUMPED too much oil? Shield with a paper towel and reduce heat for even cooking.
- When mixture is too dry, add a splash of water or lemon juice to loosen it up.
- If patties are undercooked inside, rescue with a quick 1-minute microwave blast before frying again.
Prep, store, and reheat tips
- Prepare the chickpea mixture ahead by mashing the chickpeas and mixing with herbs and spices; refrigerate for up to 24 hours. The flavors meld and the mixture firms slightly, making shaping easier.
- Shape the patties and store them on a plate covered with plastic wrap for up to 1 day. Keep in mind they might lose a bit of crispness but will still be delicious.
- Cooked patties can be refrigerated in an airtight container for 2-3 days. Reheat in a hot skillet until they shimmer and regain some crunch, about 2-3 minutes per side.
- For longer storage, freeze uncooked patties on a tray, then transfer to a freezer bag. They hold well for up to 1 month. Thaw in the fridge before cooking, and expect a slightly softer texture.
- Reheated patties will benefit from a quick sear in a hot pan—listen for that crackle and watch for a golden hue to ensure they’re crispy again.
Top questions about chickpea patties
1. Can I use dried chickpeas instead?
Use canned chickpeas for convenience; drain and rinse well to remove excess sodium and canning liquid.
2. Can I make these without canned chickpeas?
Yes, cook dried chickpeas until tender, then mash as you would with canned ones. It adds a nuttier flavor.
3. Are these patties vegan?
Yes, swap eggs for flaxseed meal mixed with water—use 1 tablespoon flaxseed meal + 3 tablespoons water per egg.
4. How do I reheat leftovers?
Warm the patties in a skillet over medium heat until crisp and heated through, about 3-4 minutes per side.
5. Can I customize the flavor?
Add more spices or herbs to suit your taste—try cumin, coriander, or fresh mint for variation.
6. What if I need gluten-free options?
Use gluten-free panko or crushed nuts if you want to keep them gluten-free; they add crunch and flavor.
7. My mixture is too sticky or dry, what do I do?
If the mixture is too wet, add more breadcrumbs; if too dry, a splash of water or lemon juice helps.
8. How do I prevent burning the patties?
Cook on medium heat to avoid burning; adjust as needed, and watch for a golden, crispy exterior.
9. What should I serve these with?
Serve with a tangy yogurt sauce, fresh herbs, or a squeeze of lemon for added brightness.
10. What’s the best pan for cooking these?
Use a non-stick pan or well-seasoned cast iron for easy flipping and crisp crusts.
These chickpea patties aren’t just a quick meal—they’re a reminder that simple ingredients can lead to something satisfying and familiar. They carry a bit of nostalgia, a touch of experimentation, and a lot of flavor in every bite. Whether you’re making them for a weeknight dinner or a casual get-together, they hold their own and invite you to tweak and make them your own.
In the end, it’s about that crispy edge, the tender interior, and the warm aroma that makes cooking worthwhile. No matter how often I make these, they always feel like a little victory—something I can whip up with pantry staples and a handful of fresh herbs. And that, right there, is enough reason to keep reaching for the bowl.